Also there is this for anyone that needs help with Ship station
ShipStation University Preparing Orders for Shipping Course
If learning by doing is more your style, take the ShipStation University Preparing Orders for Shipping course. The lesson videos will show you the different ways you can configure your shipments as well as how to split orders into multiple shipments or combine multiple shipments into one.
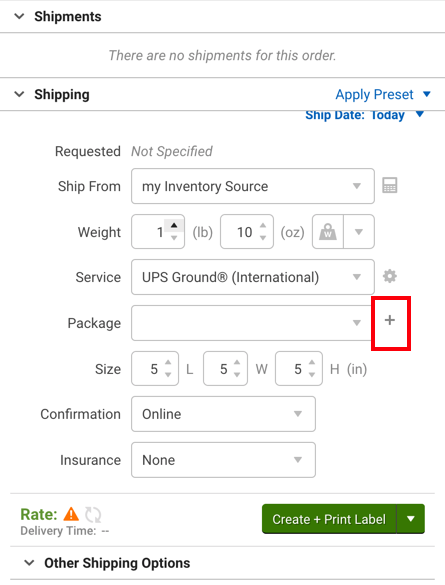
To create a multi-package shipment:
- Click the plus sign + next to the Package drop-down in the Configure Shipment Widget.
ShipStation will open the Multi-Package Shipment editor.
If the + is not present next to the package drop-down, that means the selected carrier does not support multi-package shipments.
- Set the dimensions, weight, and insurance option for the first package.
- Click Add Package to add another package, or click Duplicate to add a package with the same shipping options.
- Repeat step 3 to add as many packages as you need.
Click the down arrow to add multiples of 5, 10, or 15 packages at once.
- Check the box to Save New Package Set if this is a package configuration you’ll use again.
- Click Save Packages.
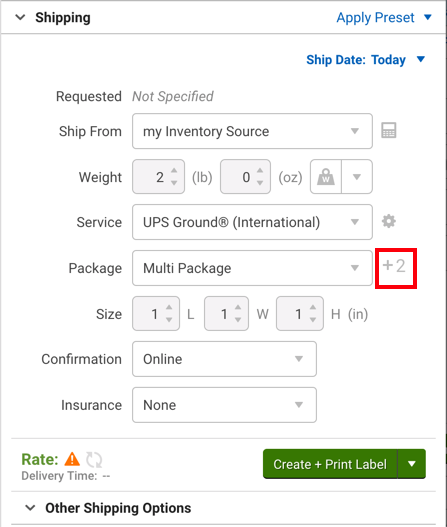
The Configure Shipment Widget will show the number of packages for this shipment next to the package drop-down menu.
To modify any packages on this shipment, click the plus sign + to reopen the Multi-Package Shipment editor.
Click Create + Print Label to print all associated labels for the multi-package shipment.
Multi-package labels will print the same way they do for any other shipment, only there will be more of them. Each individual package will have its own tracking number and label, but there will be a master tracking number that will track all included packages. This master tracking number will appear in the Tracking # column for the shipment and will also be the tracking number sent to your marketplace and customer.
See our Add Insurance to Shipments article to learn how to apply insurance for multi-package shipments.
Send Multiple Tracking Numbers To Your Customers
ShipStation’s shipment notification email will include only the master tracking number. To send the additional tracking numbers to your customers, you must do so outside of ShipStation.
I bought a SSV from you guys about 3 years ago and it just stopped working..
The ceramic element seems to be loose and will not heat up. I haven’t found much on the internet for troubleshooting. I was wondering if you guys have any tips or have run into this issue before.
The red light goes on when I turn the knob but the element doesn’t heat up at all. It has never been dropped or roughly handled. Any information would be greatly appreciated.
Yes, first off, the item might still be under warranty, do you have the date purchased and did you register the device? I can search your name and email in our system as well for you. If there is no proof of purchase or registration that is no problem. I believe your heater could have gone out. See this video. how to improve heating.
We have a mailable product to repair it diy style or you can ship the item to us and we will fix it up for you. WE offer videos to help with this process and other information here: https://www.elev8glassgallery.com/warranty/ The process is as follows
Click here to register the vape
Click here to file a claim
Once your claim is received we will ask you if you want to ship the item in yourself or receive a shipping label via email or postal mail. This label will be charged to you on the final invoice before shipping the vape back to you. Once the item is received we will repair to your needs and let you know if we find other issues to fix. The in-warranty fee is $0 for the fix or for the part. Your only expectation is shipping costs if in warranty. Out of warranty cost is $30 in house and cost of shipping or part and shipping. If all of this is overwhelming I am here to help, I can walk you through it or assist in the best way for you. I hope you have an amazing day and we can get your vape back to you lickety split! Theresa
EOK Kit SOP
We sell 3 types of EOK kits; one for the Super Surfer (SSV), one for the Super Surfer (SUP) and one for the Da Buddha (DBV). On all kits special attention must be paid to checking the integrity of the weld on the dab dish. To do this use a dab dish hose adapter and slide it over the hose connection on the dab dish. Wearing leather glove AND eye protection, gently flex the adapter to see if the weld is solid. CAUTION: too much force will break the piece no matter how good the weld is, that is not the goal! We are only ensuring a solid connection. This weld check should be done every time we are building kits. Below are the kit names and their contents.
| DBV EOK Kit |
SSV EOK Kit |
SUP EOK Kit |
| DBV Quartz Dab Dish |
SUP/SSV Quartz Dab Dish |
SUP/SSV Quartz Dab Dish |
| DBV Heater Stand Adapter |
Silver Surfer Heater Adapter |
Super Surfer Heater Adatper |
| 10mm Dab Dish Hose Adapter |
Elev8 Premier Carb Cap |
Elev8 Premier Carb Cap |
| 10mm Sick Clip |
Pick with Flat Tip |
Pick with Flat Tip |
| Elev8 Premier Carb Cap |
Tidy Tips |
Tidy Tips |
| 3’ Clear Tubing |
3’ Clear Tubing |
3’ Clear Tubing |
| Pick with Flat Tip |
Dab Mat |
Dab Mat |
| Tidy Tips |
|
|
| Dab Mat |
|
|
Once the pieces for each kit have been collected you will also grab blue bags from the shipping area for the kits to be packaged in. On the outside of the blue bag write the name of the kit you are building. You will also need to print the appropriate number of QR Instruction stickers for the number of the kits you are building. These QR stickers are to be place on the plastic pkg that contains the dab mat. When all the kits have been laid out they are ready to be double checked by a team member. After the check is complete the kits can be bagged up in their blue bags and placed in inventory on the shipping desk.
Click to see the schedule for Elev8 Distribution Decals
Elev8 Premier Schedule Sentry 3 button board Starting the Kiln
- Press the Lower Arrow (Right Button) Twice
- Press the “STRT/STOP” (Left Button) Twice, the sequence is: Right, Right, Left, Left
- This will have started the paragon Kiln
Change the temperature after running
- Press the Up Arrow (Middle Button) 3 times.
- Press the “STRT/STOP” (Right Button) Once
- Use the Arrows to set the desired temperature
- Press the “STRT/STOP” Button Once to Set the Temperature
Annealing the kiln
- Press the Upper Arrow (Middle Button) Once
- Press the “STRT/STOP” (Right Button) Twice, the sequence is: Middle, Right, Right
Running the kiln for Decals We use program 4 for running the kiln. Program 4 is used 90% of the time. Program 4 is the safest for decals. It is set to bring the kiln up to 200 degrees for 2 hours to allow any potential moisture to get out. Program 2 brings up the kiln to 1100 super fast and if there is any moisture in the decals they will have air bubble holes making the decal look very bad
The ideal method is to decal the glass 24 hours before needing to run in a kiln. This is the best. You can run run on Program 4 if in a hurry, but it is the slow ramp for the safety of the decal
Never put colored soft glass jars upright. They MUST be upside down. They will get oblong and be trash.
- Use a small blue kiln when ever possible. It is cheaper to run the small blue kiln 4 times than it is to run the big black kiln. If you have something long, part of the glass can stick out of the kiln, so long the decal is fully in the kiln.
- Fill the killn as much as you can using the jigs. Never set any glass on top of a decal. Glass can touch, but the decals can not touch.
- Press the Start/Stop button, this will run it through the sequence allowing you to see that you are in the proper program.

- Run program 4.
.

Use PROGRAM 4
- When you get to the program setting after pressing the Start/Stop button this is when you will press the up button to change the program from one to another. Do NOT use the down arrow
- You will see other programs and settings. You will only use 1 or 1
- Once you have adjusted for the proper program press the Start/Stop button until you see START on the screen, press it 1 more time and you will see on

When the temperature is on the downward cycle, at 600 or so the door can be partially opened, to assist in the cool down process when the temp is at 300-400 the door can be fully opened.