Shipping days Services are closed.

UPS: 

New Year’s Day

Memorial Day

Independence Day

Labor Day

Thanksgiving Day

Christmas Day (Dec. 25th)

New Year’s Eve

USPS:

New Year’s Day

MLK Day

President’s Day

Memorial Day

Juneteenth National Independence Day

Independence Day

Labor Day

Columbus Day

Veterans Day

Thanksgiving Day

Christmas Day

FedEx:

Memorial Day

Independence Day

Labor Day

Thanksgiving Day

Christmas Day

New Year’s Day


Sezzle Payment Method

Sezzle is the option to purchase products with 25% down at time of purchase and then an additional 3 payments for the remainder of the balance.

This is can be used on any order over the cost of $20, up to $2500.

When the order is processed through the checkout, payment is completed immediately from Sezzle, and should be in the account within 5 days, so these are fine to print and fulfill.

Eye4Fraud does not need to be checked on these since Sezzle assumes all risk of fraud.

Chargebacks are handled by Sezzle, and only involve the merchant if the product was not shipped to the customer.

Order notifications for Sezzle will also show in the email for Customercare@elev8distribution.com

Sezzle is not an option from the Manual Order processing in the Control Panel of Big Commerce, so if a customer requests to pay with it, you would need to build the cart and store it as a Draft Cart and forward the link to the customer to complete on the site to take advantage of the Sezzle payment method.

Archiving emails for Previous Employees

To Archive emails for a previous employee, you will need to have the following:
An Admin Google user account on the same domain as the email address

Access to the email account you would like to Archive.

The login for the Past@7thfloorvapes.com email account.

Once you have all of those things in place, you will log into the email account that you are archiving.


Go to myaccount.google.com and login as the email you are looking to archive.

Once logged in you need to activate 2 factor authentication for the account, use a phone number of the company that can receive  a text message for the 2nd Factor code.

Activate the 2nd factor login and save the setting.

Close the browser window and go to myaccount.google.com again and login with email address you would like to archive, go to the Security Settings on the account, and click on 2-step Verification.


You will be brought to a new dialog with the option to add App Passwords at the bottom.

Click on the right facing arrow on the right side to generate the password.

Give the App Password a name such as Gmail import, and click create.

A new dialog box will pop up with the App Password, copy that over to a safe place to find it for the following steps.

Click the left facing arrow next to App Passwords to go back, navigate to Gmail .com and login as the old user email address you are looking to archive.

Once logged in go to the gear in the top right side near the Account image, and click into See All Settings.

Navigate to Forwarding and POP/IMAP

Turn on the setting for Enable POP for all Mail even mail that’s already been downloaded.

Click Save Changes at the bottom of the screen.

Log into the Gmail account for past@7thfloorvapes.com

Go to the Gear Icon in the upper right corner and click on See All Settings.

Go to the tab of Accounts and Import

Click on Import Mail and Contacts in the Import mail and Contacts section.

Enter the old email address you are looking to import from.

Click continue.

You will copy the App Password from Previously into the password field

change the POP Username to the full email address.

test@7thfloorvapes.com

Change the POP Server to pop.gmail.com, and edit the Port to 995 and use SSL.

Click Continue.

If all of the settings are correct it will give a confirmation that the import process will begin, and you can close this window.

It will return to the settings Page for the Past@7thfloorvapes.com email address.


There will be a new entry with the old email address stating checking mail, next to the Check mail from other accounts: section.

Once all of the messages have imported the check from another account entry for the email can be deleted, but make sure that the old email is quickly deleted and the forwarder for the employee receiving the future messages is working as well, lest you not receive an important message.


Route Insurance Stamped Envelope Orders

If a customer chooses Route Insurance on an order that ships as a stamped envelope, we need to inform the customer that they will have to step up to a shipping method that includes Tracking for the shipment.

If the customer does not want to pay the additional cost for shipping, they can remove the route coverage on the order and we can refund them the cost.

You will need to make sure the procedure is followed for Removing the Route Insurance.

How to Remove Route Insurance from an Order

If a customer decides to remove Route coverage from an order before the package is shipped out we need to cancel the initial order, and replace the order without the Route coverage selected.

Use manual payment for the second order and reference the payment on the initial order in the summary field.

Refund the cost of the insurance coverage back to the customer on the initial credit card transaction, through the refund request form.

Modem Hardware at Elev8 Arts Center

All service locations will have an Underline Gateway (also known as an ONT: Optical Network Terminal) installed connecting the site to the Underline network. We provide the Adran SDG 854-6 (Wi-Fi 6) device. The Underline Gateway is virtually controlled and configured through your Underline account, in case you’d like to change things like the WiFi password. In addition to this Gateway, clients can use their own equipment in order to control a variety of advanced settings.

Did this answer

Adding New Desktop Phones

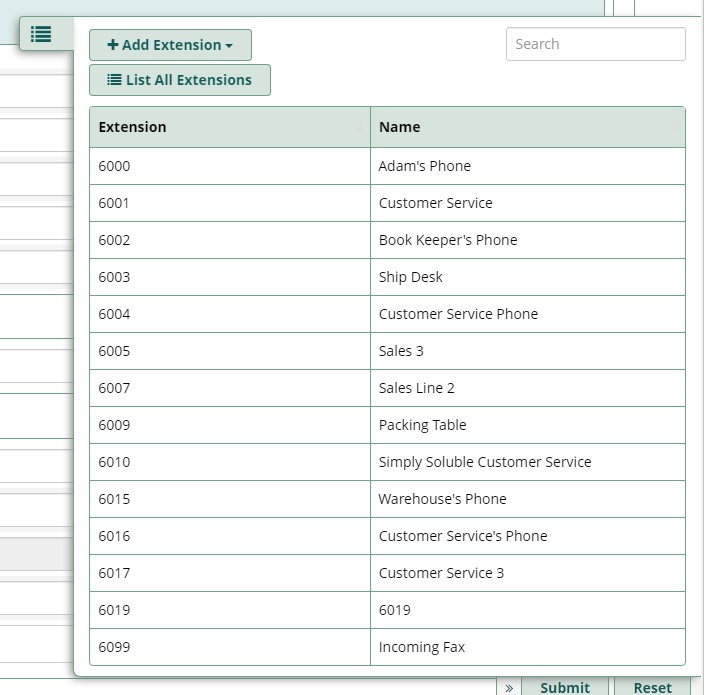
This process can’t be completed until the Extension has been setup on the Phone Server Side

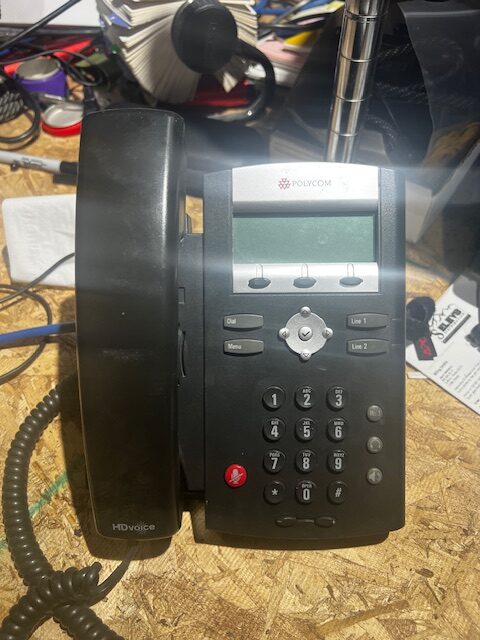
Locate a Polycom IP335 phone and power cord.

The phones will accept up to 24V of input from the power transformers, locate one that sufficient to power it on.

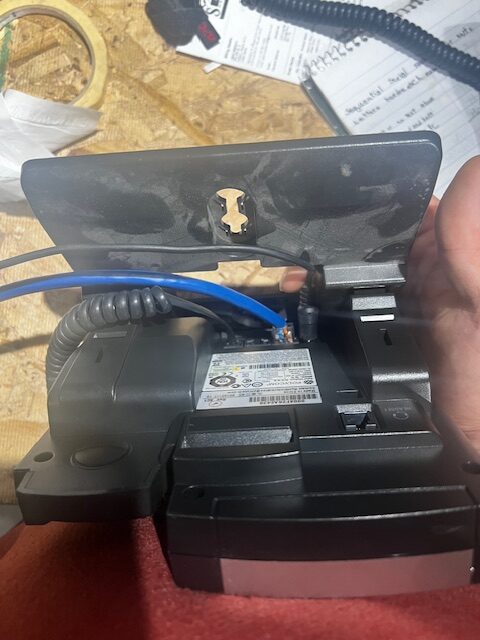
Plug in the network cable to the Lan Port on the back

Insert the power cable in the port to the left of the Lan Port.

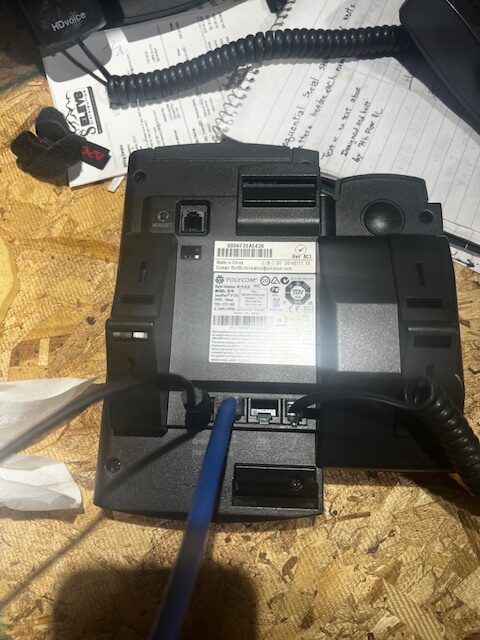
Next attach the base to the phone if it is not already.

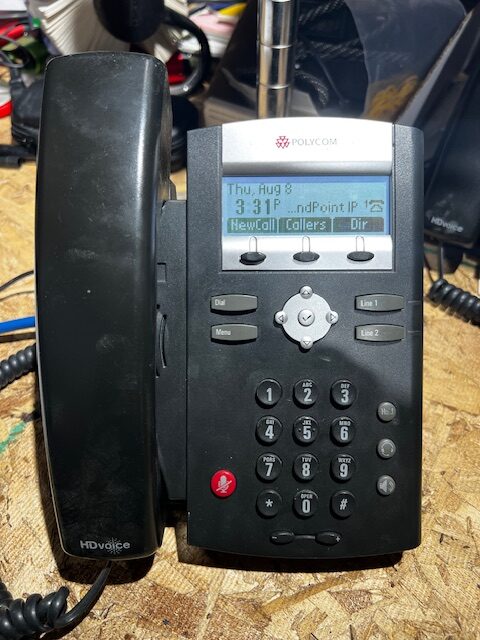
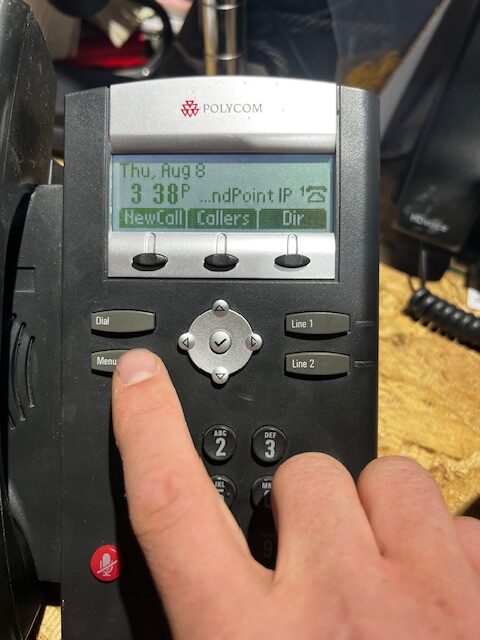
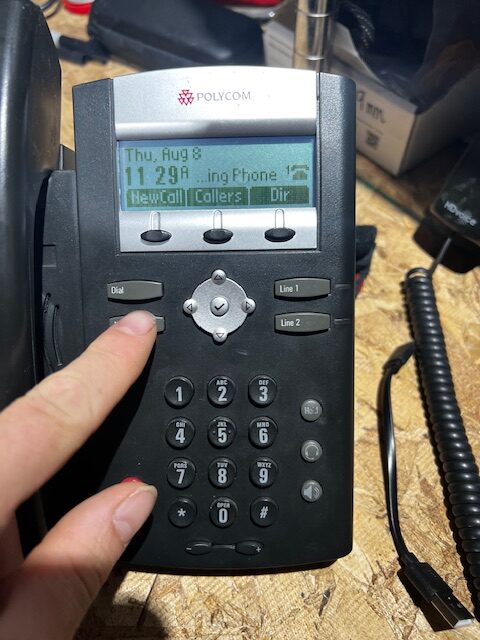
Once the phone is powered up wait for the network to connect.

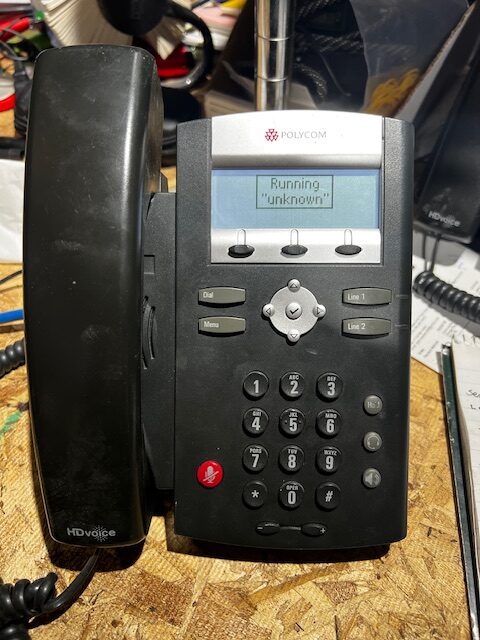
Once the device is booted up and network is connected, you will access the Menu, to see what IP address it pulled.

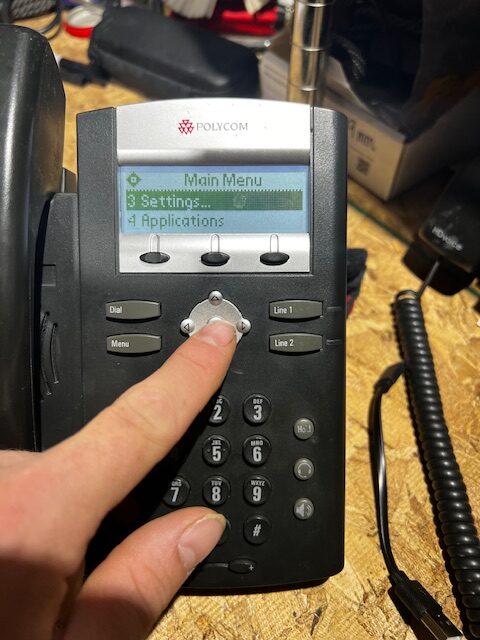
Press the Menu button.

Down button to get to Status.

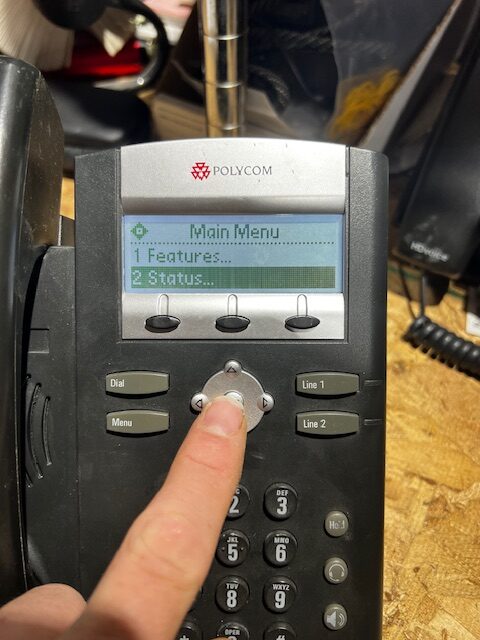
Followed by the Center button to go into Status

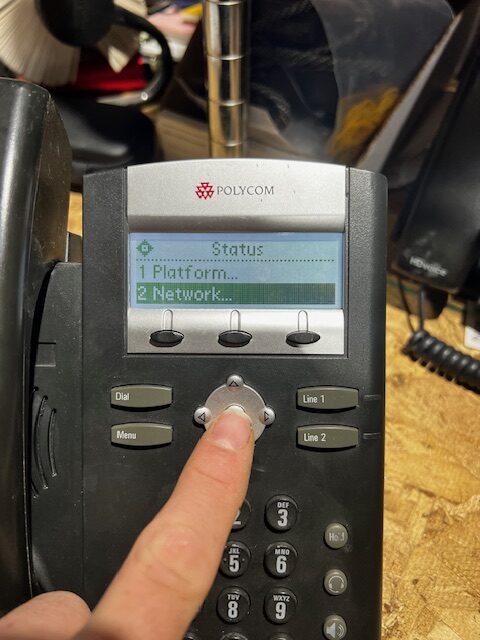
Down button to get to Network and then the Center Button.

Click the Center Button on TCP/IP Parameters.

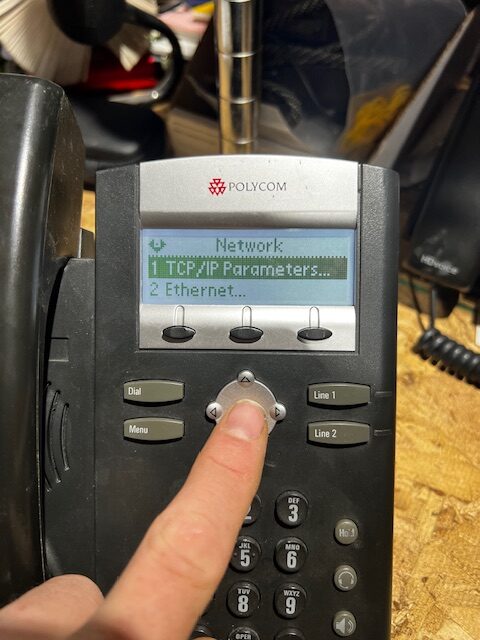
Once in that screen you need to take note of the IP Address assigned to the device, this will vary on each device.

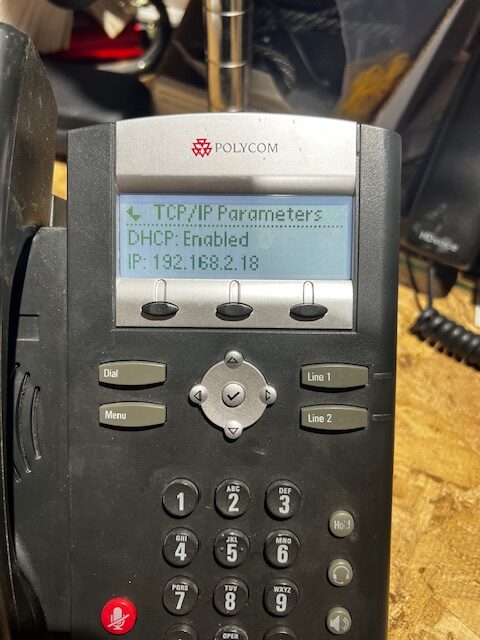
In this instance it is 192.168.2.18, open a new browser tab and type in the IP that is showing on the phone you are setting up.

You will reach a web page that shows Polycom Web Configuration Utility

Look to the center of the screen for the login window.

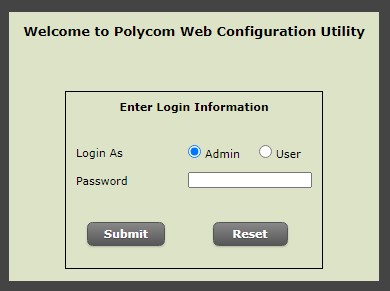
The password on a phone that is default settings will be 456 for the password.

Press Submit.

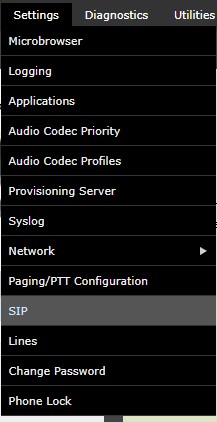
You will now have a menu at the top left of the screen.

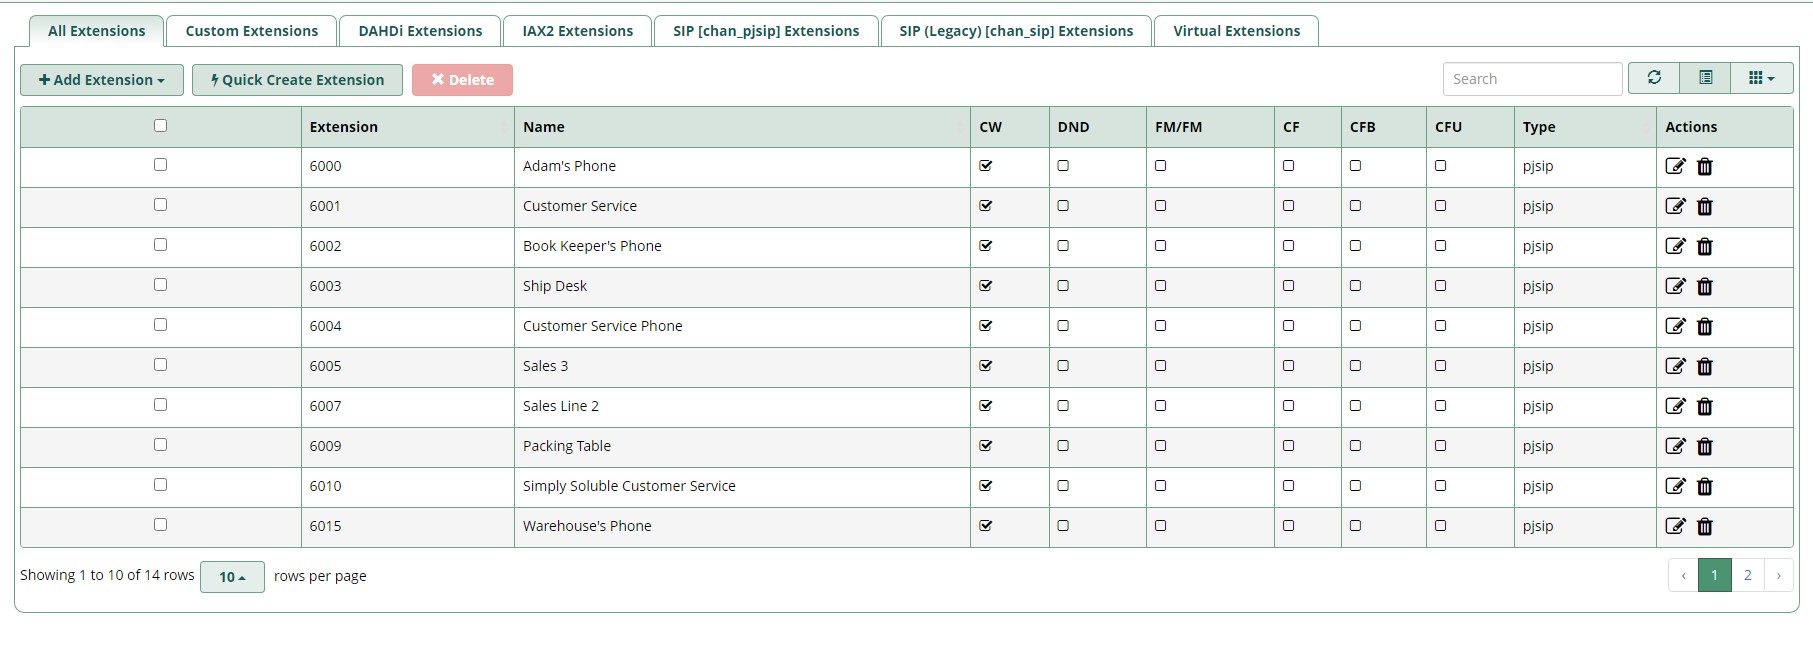
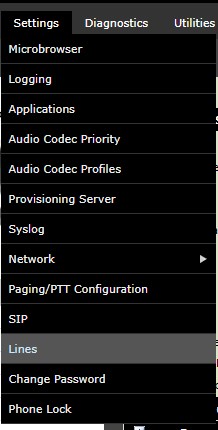
The first step is to go into the Settings > SIP

This will be mostly the settings you just created on the phone server side, so it’s probably good to keep that window up as well.

Once in the SIP Settings, nothing needs to be changed in the top portion, you will expand the Server 1 Section, that’s where you will put in the settings that are crucial to connecting to the phone server.

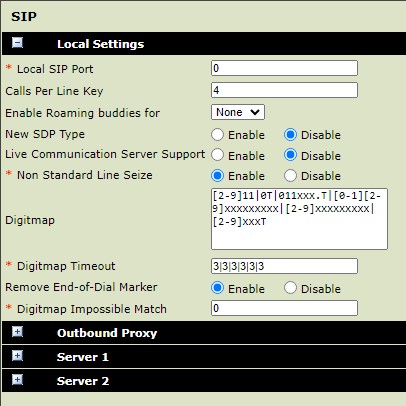
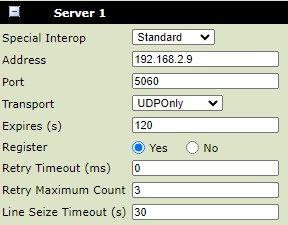
The first field is the IP of the phone server itself, this is 192.168.2.9

The port is where it reaches the Server at the IP so 5060

Transport is the protocol and it needs to be UDPOnly

Expires is how often it request the connection set to 120

The rest of the setting can be left at default.

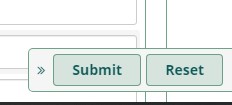
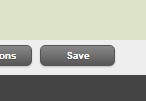
Once those settings are changed, you can Click Save at the bottom of the page.

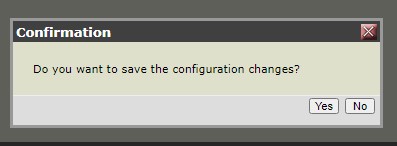
Click Yes on the Confirmation dialog box.

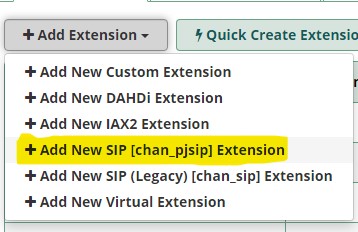
The next Setting we will change are in  Setting > Lines.

This will be the phone extension and secret that were created in the previous article, so it is nice to have that Extension window open as well.

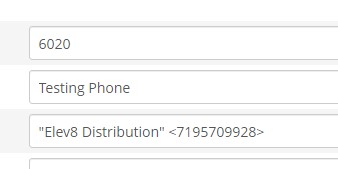
Once the window is up for the Lines, you will be presented with the display extensions settings.

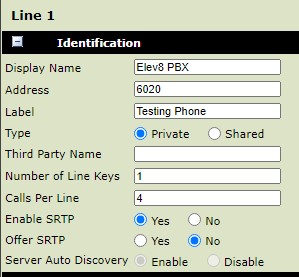
The Display Name can really be anything that describes the server it is connecting to.

Address is the Extension you entered on the phone server side.

Label is what will show on the phone screen.

The rest of the settings in this section can remain the same.

Now move to the Authentication Section.

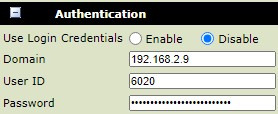
The Domain is the IP of the Phone Server 192.168.2.9

The User ID is the Extension.

The Password is the Secret that is in the Extensions window on the Phone Server side.

Once those are entered move to the Server 1 section

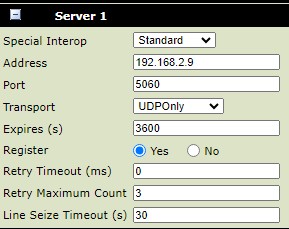
Enter in the Address that is the Phone Server IP address, 192.168.2.9

Port is 5060

Transport needs to be UDPOnly

The rest of the settings can remain the default.

Move onto the Message Center section.

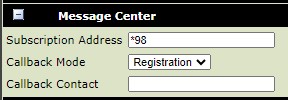
Subscription Address is where the Phone checks for Voicemail Messages, enter *98

Once all of the settings are confirmed scroll to the bottom of the page and Click Save again.

Click Yes on the Confirmation dialog window.

The phone will reboot, and the new settings will be applied.

When the phone comes back up, you will see this.

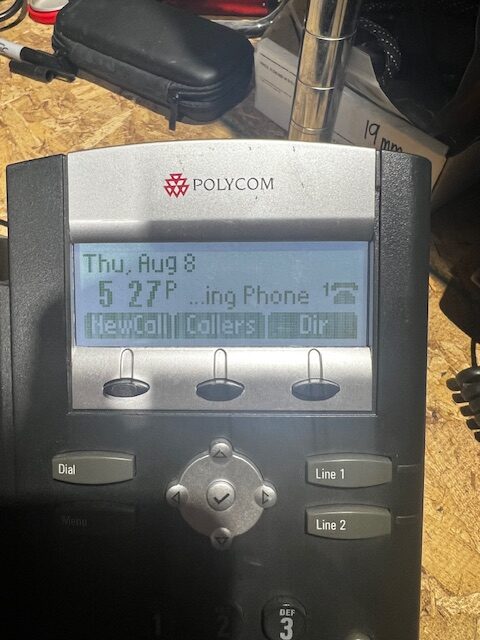
The solid Icon of the phone shows that it is connected and good.

If you see this, you have an issue with one of the settings.

This means the line isn’t registered, double check your settings for the extension and the Secret stored for the extension, once you have confirmed them, you will need to reboot the phone to see if the line registers properly.

If it does you are good to test the extension from another desktop phone.

Dial the new Extension and see if it rings through.

Try dialing out from the new extension as well.

Once these are confirmed there are a few last settings that need to be modified to place the new device in service.

Go back to the configuration website.

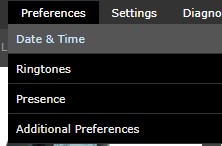
Click on Date & Time under Preferences.

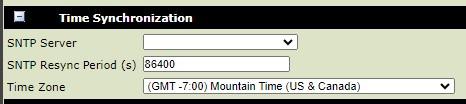
Click into the section for Time Synchronization, and change the time zone to (GMT -7:00) Mountain Time (US & Canada)

Click Save at the bottom after modifying the setting.

Click yes on the Confirmation dialog box.

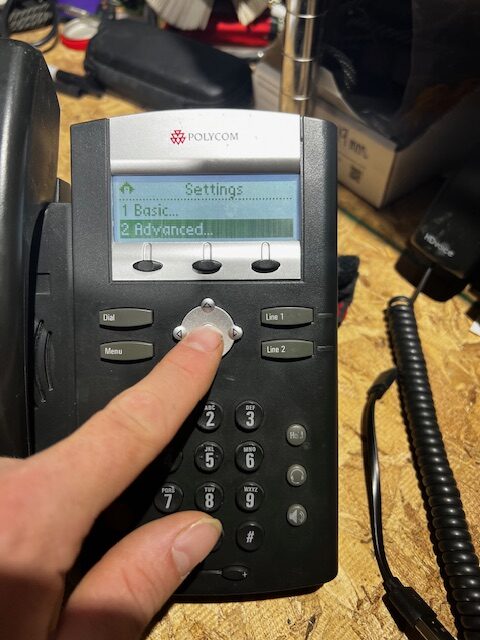
On the phone go to Menu

Then down to settings.

Click the center Button on Settings, and down to Advanced.

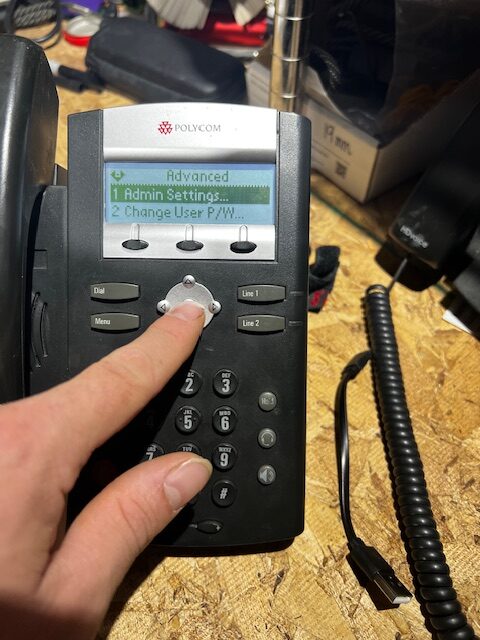
Click the center button.  It will ask for a password again it will most likely be the 456 press enter when that is entered.

Click the center button on Admin Settings.

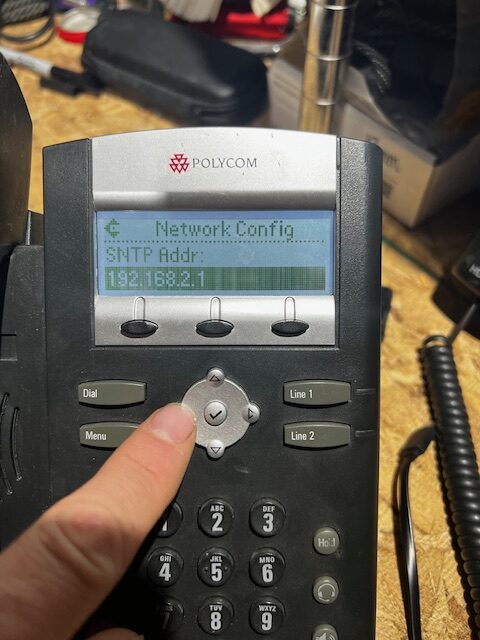
Next click the Center Button on Network Config.

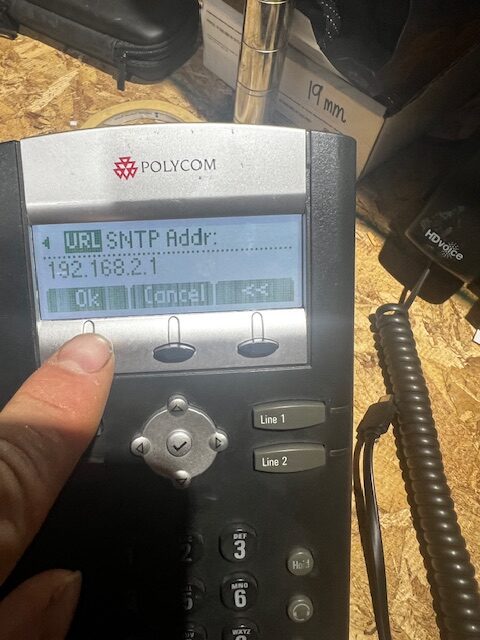
Click down until you get to SNTP Addr:

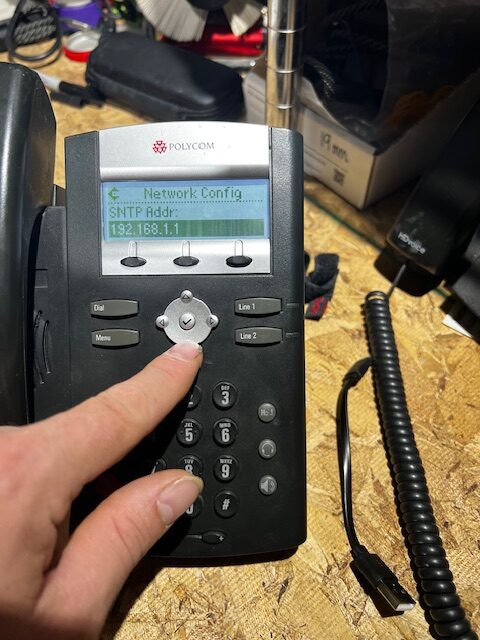
If there isn’t an IP entered click the center button to enter it.

Start with 192 on the key pad, and then press # to change the input method to URL

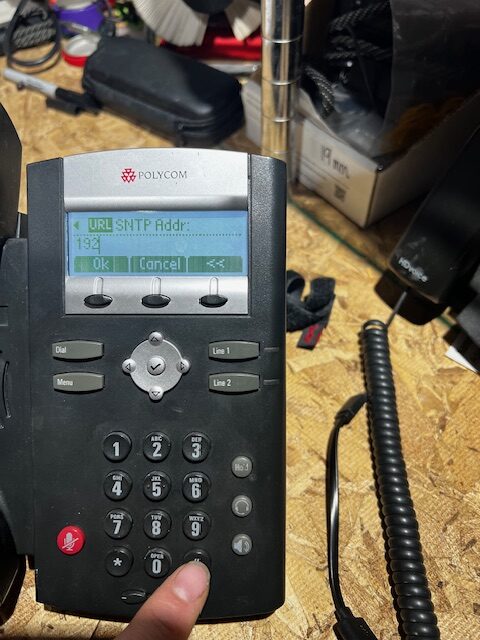
Now press the * key for a period.

Continue entering the rest of the IP Address, 192.168.2.1

Once complete press the button under OK

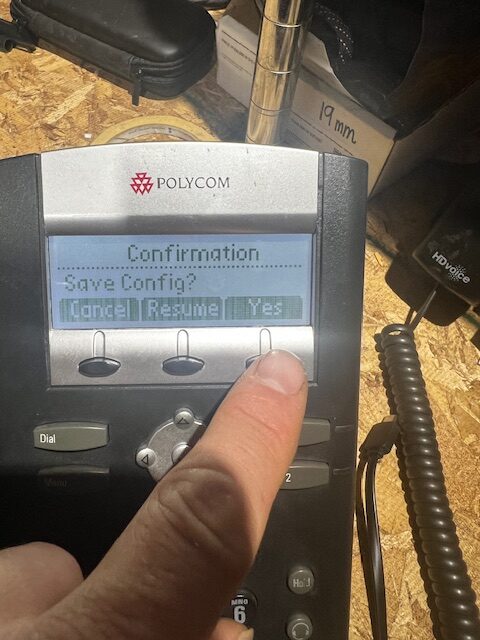
Next press the left arrow key.

You will be presented with the menu options to Save Config?

Click the button under Yes

You can now back out to the main screen of the phone, using the left arrow button.

Once the phone has been tested for outside incoming calls it is good to be placed into service.

Adding extensions to the Phone system.

Open this Asterisk Phone Server make sure you are in the internal network at 6335 E Platte.

Once to the log in, use the Username extensions and the password in the spreadsheet.

Once logged in, Click on Extensions in the top Left of the bar.

That will bring you to the list of existing extensions.

In the top left about the headings there is a button to + Add Extensions this is the drop down menu to choose what type of extension you would like to create, we primarily use SIP Extensions.

Click on the Add New SIP [chan_pjsip] Extensions

That will bring you to the new extension to fill in the specifics.

First is User Extension, we generally put extensions in the 6XXX series, look at the over extension list by clicking the Hamburger Menu on the right to see what the last extension used is.

Once you have chosen your extension to create put it in the top field.

Move next to the Display name this is going to be a description of where the phone is located, I.e. department desk or physical location in the warehouse.

Outbound CID you can just put the phone number “ELev8 Distribution” <7195709928>

Leave emergency CID blank.

The next field is the Secret this is going to be entered on the phone once it is connected.

So after the first three fields you should have something that looks like this:

The Language Code should be left at Default.

User Manager Settings should be left alone at this point as well.

Click to the next tab at the Top for Voicemail: if the phone will have voicemail setup on it you will change the Setting to Yes next to Enabled, if not leave it as it is on No.

If it is enabled proceed to the settings below.

For the voicemail password set the extension number to force them to set their own password the first time they check it.

Require from Same Extension should be set to No, to allow them to check messages from any extension or outside phone.

If they will be checking from an outside line the Disable (*) in Voicemail Menu option needs to be toggled to No, otherwise it can be left to Yes.

If the user would like to receive email notification of voicemails they can have their email added to this field.

The remainder of the fields can be left untouched.

At this point nothing needs to be done with the additional tabs, and the Submit button in the bottom right corner can be clicked.

The extension is in the system at this point but it is not yet active, until you click the Apply Config button in the top right corner.

Generally it is a good practice to not apply config until others are off the phones since it can interrupt calls in progress.

Once it is confirmed no one is on the phone click Apply Config.

This only one half of the process the next step is to setup the desktop phone and enter the extension it will be connected with and the Secret from the initial setup of the extension.

How do retail contacts get created in Elev8.one

Any time a customer is created on Big Commerce as an account or a Guest account is converted to a Customer Account that will automatically generate a contact in Elev8.one.

The only contacts that are created manually in Elev8.one are the ones that are associated with Wholesale or Distribution accounts since they won’t have an individual Big Commerce account made for them.