
Follow this link to the article, https://elev8glass.com/dwkb/filing-claims-for-route-shipment-insurance/
Does our Vinyl tubing contain PHTHALATE
We have confirmed with our supplier that our tubing does not contain PHTHALATE.
Credit card information handling
As to remain compliant with PCI-DSS Regulations we require all staff that are inputting sensitive credit card information, PAN, CCV2, or Expiration information to be aware of and abide by set in place regulations.
Card information is never to be stored on our computers, network or in plain view. Card information is never to be kept in plain text or received in an unencrypted transmission method.
If card information is received in such a method it is to be properly disposed of in accordance with 9.4.6 of the PCI DSS Regulations once no longer needed, and stored in a secured location until the time which it can be disposed of properly. If you do not have a secure space to store the information get with Book Keeping to have them locked in a storage place.
When credit card information is received through phone communications it is insured not to be recorded in the course of the conversation and IT is informed if sensitive information is recorded so that it can be destroyed in accordance with 9.4.7
Diagram of Network for CDE
The main network at Elev8 Distribution is as follows.
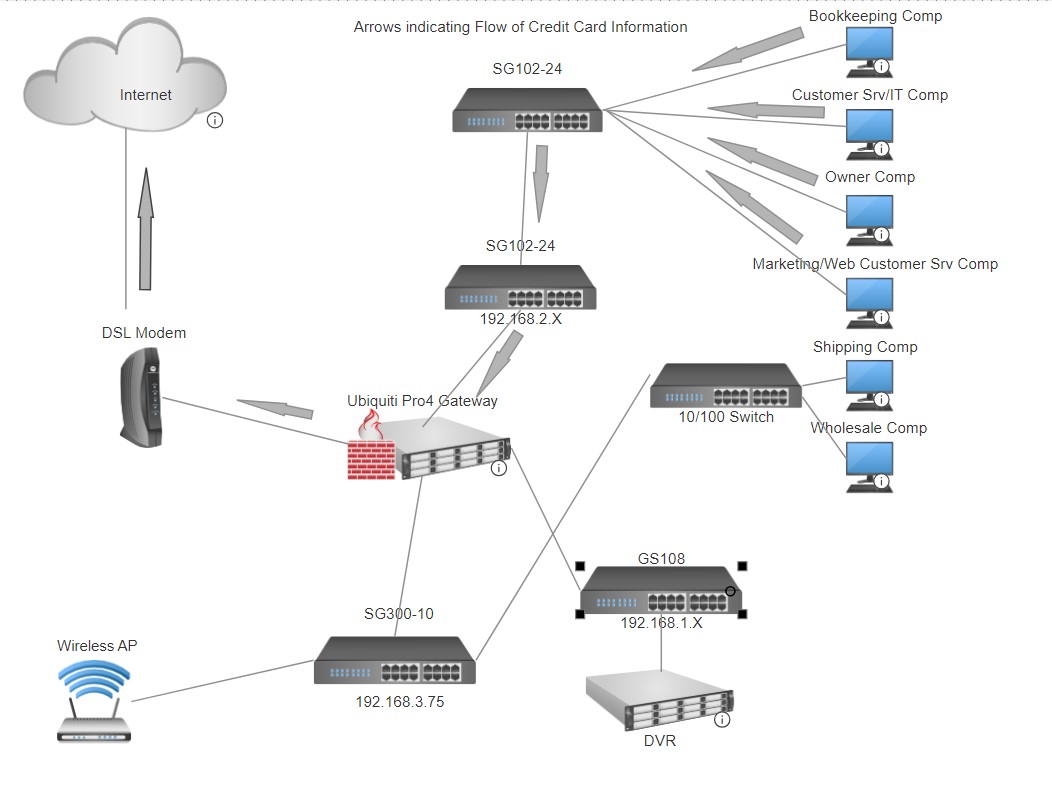
All other networks as well as wireless activity are segregated from the 192.168.2.X network, and all paths of travel within the 192.168.2.X network are encrypted.
Procedure for Patching CDE Workstations
All work stations that are operated in the Card Data Environment are operating on Windows Desktop operating systems.
Major patches are released on the second Tuesday of each month, these will be checked on that day, to confirm that all machines have them successfully installed. The procedure will be going to Settings, and Update & Security, and check for updates.
Select and install all outstanding OS related updates.
If there are any critical patches that are out of band with the normal schedule they will be addressed as they are released.
Out of band critical updates will be received by subscribing to Microsoft’s security bulletins.
Shipped Orders from ShipStation Marking Wholesale Needs Quote in BigCommerce
When an order is shipped in ShipStation it should notify BigCommerce with updating the status to Shipped.
If there are orders coming into BigCommerce with the Status of Wholesale (needs shipping quote)
Check that the ShipStation Connect app running on the Shipping Computer is connected and online.
The process for checking that can be found HERE
Taking Credit Cards Over the Phone.
If a customer is calling to place an order you will eventually need to take their credit card information over the phone to enter into the Manual Order Cart page to complete the transaction.
Since we are PCI DSS compliant you must stop recording the call for the time that you are receiving the card number over the phone.
If the customer called in through the customer service line the call is recorded by default, so you must temporarily disable it for the portion when you discuss the credit card number.
To do that, you must press *1 you will hear a long tone and that is to indicate that the recording is stopped.
Once the portion of the call disclosing the credit card information is complete press *1 and you will hear a short tone to indicate the recording is going again.
If you have a call that you forget to suspend the recording for the credit card portion please send a message to adamn@7thfloorvapes.com to indicate the recording that needs to be deleted.
Why don’t I see all Shipping options in the Cart
Since we have ShipStation retrieve quotes for orders processing on the site, there is unfortunately a feature that they don’t show all shipping quotes if two services are coming in at a similar price.
Which means you might not have a specific shipping method offered.
You will have to go to ShipStation, go to the Rates in the Top Right, of the top part

Click into it, and give the Destination Zip Code.

Check the box next to Residential Address,
Put in the estimate of the weight of the package and the box that the shipment would fit into.
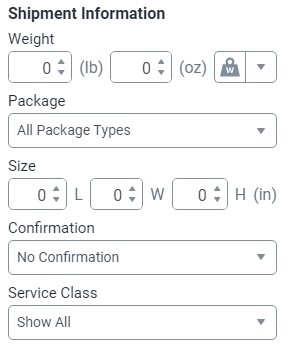
After all that information is in, click on Browse Rates at the bottom of the dialog box, and look to the right side of the box.
Click into the shipping Company that you are looking to get a quote for.

This quote is our negotiated rate with the shipper, you will need to add in the box cost on top of the shipping quote.
Shipping Issues and How to Resolve Them.
There is a wide range of issues that can arise through customer service.
In no particular order here are the most common and how to resolve or comfort the customer’s concerns.
Customer wants to know why their order hasn’t shipped yet.
There are multiple reasons an order may not have shipped the day it was received in the system, first and foremost if it was placed in the system outside of the normal business hours, we check order 2 to 3 times during the day, but once the shipping companies have picked up for the day, we generally stop processing new orders until the following business day.
We state in our Shipping and Returns policy the following:
- We aim to ship all orders within 24 hours from the time when the order is initially placed (excluding weekends). Items which need to be produced may take longer to process, up to 5 business days depending on the specific product. Call us at 719-570-9928 for more details before placing your order.
Further to that if the order has any customized items or glass parts that need to be made specifically for the order that will extend the processing time.
If when looking at the order and you do not see any messages to the customer regarding a part being made or any custom items on the order, follow up with the shipping department to see if they have the order for picking or what status it has.
Customer has not received their order and package hasn’t moved in multiple days.
This one is going to vary based on the shipping method:
USPS: if the Tracking is showing Label Printed Awaiting Acceptance
That means that the package has either not left the warehouse yet, or that the shipping label was cancelled for some reason and the customer only received the initial shipping label, in that case check the ShipStation records for additional shipping labels for that customer.
Resolution: assure the customer that the package will be getting picked up that day or dropped off at the Postal Location at the end of the day, and to check the tracking information the following day.
If the package tracking is showing that the package has moved past the Awaiting shipment status, and has been accepted by the postal service but has not moved for 1 to 2 days, assure the customer that the Postal service has the package and that some times these delays do happen especially with USPS Ground Advantage.
Check back with the tracking information the following day, if the package has still not moved and continues to not move for multiple days, at the 10th day from shipping, a claim will be submitted to USPS. with that offer to allow the customer to place a replacement order for the product at 50% off the cost of the original, with the offer to refund the cost once the claim has been approved for the initial shipment or if they refuse the initial shipment if it does end up being delivered to the destination.
If the shipment does arrive and they keep both, that’s fine as well.
With some claims through USPS the claim may get to the Pending Review stage and can take up to 60 days from the initial claim to resolve. When that happens the customer may get frustrated with the fact they do not get refunded for the second order, but that can not be completed until the claim has been ruled on by USPS or the initial package has been returned or received in the warehouse.
UPS: When a label shows Awaiting Pickup make sure that it has been in fact picked up, and that it didn’t get dropped in the USPS bag with the pickup for that. If it has, we need to reach out to the Postal Station immediately to see if it can be retrieved.
If a UPS package is not moving for a couple of days, you can submit a claim Here
While the claim has is waiting for a ruling on approval or decline, you can offer the customer a new shipment for 50% off the cost of the original shipment, with the offer to refund the cost once the claim has been approved for the initial shipment or if they refuse the initial shipment if it does end up being delivered to the destination.
FedEx: File the claim by logging into the main FedEx shipping account on the website and file claim. Similar to the UPS process and USPS, While the claim is waiting for a ruling on approval or decline, you can offer the customer a new shipment for 50% off the cost of the original shipment, with the offer to refund the cost once the claim has been approved for the initial shipment or if they refuse the initial shipment if it does end up being delivered to the destination.
Customer needs to change the delivery address of the order
If the customer calls in stating that they would like to have the package delivery address changed, the first step is to see where the package is, and what method it was shipped, if the package is scheduled to deliver that day, or the following it may be too late to initiate a package intercept.
FedEx: If the package is a few days out still the cost to intercept and change the delivery address is $22, and can be initiated by the shipper. FedEx also offers hold at location for free, but the only caveat is that the receiver must be able to provide a government ID with the original destination address on it, and their name.
UPS: Delivery intercept costs $27 for a same day request, or $21 for a future day request.
USPS: Delivery intercept costs $17.50 Domestic Only.
Package tracking stating delivered but customer states it is not there.
As per out terms of service on the website if an order is marked as delivered by the shipping carrier, the package is considered fulfilled, if the customer does not possess the package it now becomes a matter that needs to have a police report filed for and contact the United States Postal Inspection Service if it was sent by USPS service. If the package was shipped with UPS, the same thing is required a police report filed and a claim made, although barring gross negligence on the part of UPS they generally do not authorize refund of shipment for stolen packages. The last option is a claim on renters insurance if the customer carries any coverage, but depending on the value of the shipment, it might fall below the cost of the deductible or be over the maximum value allowed by the policy.
The only time we are able to do anything on the behalf of the customer regarding stolen packages is if the customer has chosen to insure the package with Route Coverage, in which case they do cover stolen packages. The process for submitting a claim to Route can be found Here. As well as additional information regarding using Route Insurance for Orders
Package arrives and is visibly damaged.
First step is to request that the customer retain all packaging material, and document the state in which the package arrived, photos of the exterior of the box before it is even opened are optimal. Once the customer opens the package to keep all internal packaging and see if any items are damaged with in the packing, if they are we will submit a claim with whichever shipping company was handling it.
USPS Ground advantage, UPS and FedEx only carry $100 worth of liability coverage unless a declared value is defined during the shipping process, or the customer has elected to purchase Route coverage for the shipment as well.
FedEx will only cover products made of glass and a declared value with their service to a maximum value of $1000.
For any shipments that are sent through UPS with a declared value of more than $1,000 the shipper must retain a high-value shipment summary signed by the driver.
The only option around this issue is to either declare a value that the customer will pay for additional cost on the shipping or to have the order insured through Route.
Shipment didn’t arrive in the time I paid for
If the customer opts for expediated shipping methods, there are inevitably going to be some shipments that don’t make it on time.
Similar to why hasn’t my order shipped yet, we have in our Shipping Terms and Conditions, that expedited shipping does not guarantee faster processing. If the customer is worried about making a specific ship date it is best to contact us over the phone so we can assess the situation.
If the order was paid for a faster shipping time, and was shipped a regular method, we have the option to refund the customer to the lower shipping method cost.
If the customer paid for faster shipping method, and the order was processed within the regular allotted time from our terms and services, and shipped with that method, and did not arrive in the aforementioned time, there are other factors to look at, did the order go out on a Friday? neither UPS or FedEx consider Saturday a business day without additional cost or modifications to the shipping standard.
If all steps are found to be within the definition of when the order should have arrived with an expediated shipping method and the item was sent Overnight or Next Day Air Service, than the next step is to file a Failure of Service Dispute.
With FedEx, that needs to happen once the actually shipment has been invoiced. From the time the customer reaches out, that could still be a few days, and as our Shipping and Returns page states, we are only able to refund a customer for a Failure of Service Dispute once we have been refunded. When filing the dispute FedEx will immediately provide information as to if the shipment is eligible for a Failure of Service Dispute, often due to inclement weather or mechanical failure the shipment will not qualify for a shipping cost refund, and unfortunately in these situations we are not able to provide a refund to the customer.
For UPS you are able to dispute it through UPS customer service or invoice dispute. UPS claims for failure of service must be filed within 15 days of the package being received, otherwise they will decline the claim.
What is Route Insurance
Route insurance is a second layer of coverage over shipments that are sent through USPS, UPS, or FedEx, since the packages are only covered by $100 of liability for undeclared value items by default with the shipping companies. By adding Route, for the cost of $1.15 for the first $100 of product purchased or 3% of the product cost for orders over $100.
Route insurance covers the package while it is in transit, if it is lost in transit, or damaged, and even covers if the package is stolen upon delivery at the recipients place of delivery.
If there is an issue the claim can be filed by the customer or the sender, and is outline Here.